
Pepper Jack cheese is a semi-hard cheese that is mild in taste and melts really well. It’s great for grilled cheese sandwiches or queso and makes a crazy good mac ‘n’ cheese! Follow along and I’ll teach you how to make it yourself.

I am continually astonished by the cheese making process. Watching milk go from liquid to solid is a an amazing thing.
And all the little variations of temperature and time that create different flavors and textures is fascinating to me.
Then when you throw in seasonings like you do in this Pepper Jack recipe, you add a whole ‘nother layer to it.
There are endless variations of cheeses that are being made all over the world every day. And what’s so cool about that, is that means you can craft one that’s exactly tailored to you and your preferences.
That’s why this homemade Pepper Jack Cheese is such a perfect recipe!
Cuz you can make yours just the way you like it and I can make mine just for me and we can both have the perfect Pepper Jack cheese!
Don’t you just love it when everyone wins?
Pepper Jack Cheese is a variation of Monterey Jack that was originally brought to America by Franciscan friars in the old west town of Monterey in what’s now California.
Pepper Jack can be made with any kind of peppers that you want to use. Some people put in hot peppers like jalapenos or chipotles for a nice kick, and others put in sweet peppers. And then there’s others that use a mixture of both.
I personally don’t like the taste of jalapenos or a whole lotta heat, so the perfect Pepper Jack for me is mild and flavorful. So my peppers of choice are dehydrated green and red bell peppers, red pepper flakes, and black peppercorns.
But you get to use whatever kinds of peppers that you want to.
And you can use it anywhere a recipe calls for either cheddar cheese or Monterey Jack. Of course, if you want to just eat a chunk by itself or layered with sausage on a cracker, go for it!
Pepper Jack has to be pressed in a cheese press. This is the one that I have from New England Cheesemaking Supply and I love it!
I’ve used it for about 10 years now and have zero complaints.
There are all kinds of presses available. There are even plans for DIY cheese presses out on the interwebs if you’re a crafty type.
OK. Enough talk! Let’s make some Pepper Jack cheese!

Pepper Jack Cheese Recipe Ingredients
- 2 gallons of milk (don’t use ultra high pasteurized milk, it won’t form curds)
- 1 packet of mesophilic cheese culture (or 1/8 teaspoon bulk mesophilic culture) I get mine here
- 1/2 teaspoon regular strength liquid rennet, dissolved in 1/2 cup of cool filtered water
- 1 Tablespoon sea salt or cheese salt (make sure to use non-iodized salt)
- 1-3/4 teaspoon to 2-3/4 teaspoon total of dried coarsely ground peppers of your choice. I picked the peppers I wanted to use, then put them into a coffee grinder to grind them up.
Cheese Making Equipment
- straight sided stainless steel pot large enough to hold 2 gallons of milk
- instant read thermometer
- large towel to insulate pot
- curd knife or knife long enough to reach the bottom of the pot for cutting curds
- cheese press with mold that will hold 2 gallons of milk
- 2 – 3 pieces butter muslin
- stainless steel colander
- cheese mat or piece of plastic canvas to dry cheese on
- cheese wax if you are going to wax before aging
Instructions for Making Pepper Jack Cheese
Put the 2 gallons of milk into a large stainless steel pot. Over medium heat, bring the milk up to a temperature of 90°F.
Sprinkle the mesophilic culture over the top of the milk and let it rehydrate for 2-3 minutes.
After it’s rehydrated, stir the culture in with a large stainless steel or wooden spoon using and up and down motion.
Once it’s stirred in, cover the pot and let it sit undisturbed for 30-45 minutes.
You need to keep the milk at 90°F during this time. I usually leave the pot in the burner but turn the burner off.
Then I carefully cover the pot in an old beach towel to insulate and hold in the heat.
Check the temperature a few times to make sure it’s holding steady.
During this time the milk is “culturing” or “fermenting” or “ripening” depending on which book you read.
What that means is that the culture we added to the milk is growing and reproducing. This is what gives the cheese it’s flavor.
While the cheese is ripening, I get my pepper mixture ready. I put them in the spice grinder/coffee grinder to make the pieces a little more uniform.

I’m using black and white pepper corns, red pepper flakes, and dehydrated bell pepper chunks.
After this ripening period, stir the milk to make sure that any cream that has separated is mixed back in well. You will only have to do that if you are using non-homogenized milk.
Curds and Whey
Now slowly pour the rennet and water mixture into the milk while stirring. Again, use an up and down mixing motion. It’s really important that the rennet gets mixed in all the way down to the bottom of the pot.
So make sure it’s mixed, but don’t over mix. Not longer than about 30 seconds or so.
And now put the lid back on the pot and cover with a towel if you’re using one and let the pot sit undisturbed for another 45 minutes.
After this 45 minutes are up, the whey should have begun to separate from the curd. You should see a layer of clear to greenish yellowish liquid floating on top of the curd.
That greenish yellowish liquid is the whey. As in Little Miss Muffit whey.
As the milk solids begin to form the curd, the whey separated out.
Cutting the Curds
Now it’s curd cuttin time!
Using a long knife that reaches to the bottom of the pot, cut the curd into 1/4 inch (ish) strips. Don’t stress over trying to make the cuts perfect, close to 1/4 inch is good.
After you’ve cut the curd in one direction, turn the pot 90 degrees (a quarter turn) and cut more 1/4 inch strips perpendicular to the first ones.
After cutting both directions you will have 1/4 inch squares.
Now comes the tricky part.
Hold the knife at a 45 degree angle and cut down diagonally through the cuts you’ve already made.
Turn the pot 90 degrees and cut diagonally through the cuts again.
Repeat that twice more. When you’re finished you will have diagonal cuts in all 4 directions.
I know that sounds like a lot and it’s a little confusing, but it takes a whole 2 minutes. Promise.
Put the lid back on and cover the pot up again. Leave this to sit for another 45 minutes.
Cutting the curds allows more of the whey to separate out from the solid cheese.
This is what it should look like at this stage. You’ll notice that my curds are not exactly 1/4 inches.

Cooking the Curds
After 45 minutes, remove the towel if you’re using one and turn the heat back on to low.
Over the course of the next 30 minutes bring the temperature slowly and steadily up to 100°F. That’s probably going to be about 2° per minute or so.
If it starts to heat up too quickly remove the pot from the heat.
Stir gently and frequently during this time to keep the curds from clumping together. Use the spoon to cut any curds that are too big.
The curds will begin to shrink as you bring the temperature up and will tend to settle on the bottom under the whey.
This part can be the trickiest, so make sure you don’t have any distractions. You need to make sure that the temperature doesn’t go over 100°F.
Once the temperature has reached 100°F you need to maintain that temperature for another 30 minutes. I turn off the burner and carefully cover the pot with the towel again.
Stir every 5 or 6 minutes to keep the curds from clumping together. Make sure the temperature stays within 2° of 100°F.
After the 30 minutes are up, let the curds rest for 10 minutes without stirring to allow the curds to settle to the bottom. Cuz now it’s whey past time to get rid of some of that whey!
Pour out about half of the whey until you have just enough left to cover all the curds.
You can keep the whey and use it in smoothies or sauces or gravies. You can also feed it to your animals.
Whey has nutritional benefits that you can read all about in this article here.
Cooking the Curds Again
And once again you need to keep the curds at 100°F for another 30 minutes. Stir every few minutes like before to keep the curds from clumping.
After those last l-o-n-g 30 minutes are up, put the curds and remaining whey into a colander lined with butter muslin or an old pillow case.
Make sure the colander is over the sink or another pot if you intend to keep the whey.
Add the sea salt and the pepper mixture that you chose. Mix it in carefully with your hands until it’s all equally distributed through out the curds.
Now allow the curds to drain until most of the whey is gone.

Pressing the Cheese
Now comes the really fun part. It’s time to load the cheese press!
Line your cheese press with a piece of butter muslin. Try to get it as smooth around the sides as you can.
Put the curds into the mold in even layers. Fold one side of the butter muslin over the top of the curds and add the pressing plate.
Put the follower block on top of that and put it in the press.
Tuck the rest of the butter muslin up into the top of the mold so you don’t get puddles of whey everywhere.
Make sure you have a drip pan in place before you apply any pressure.
Press the cheese at 5 pounds of pressure for 15 minutes.
After 15 minutes, remove the cheese from the mold and flip it over onto a fresh piece of butter muslin. This is called “re-dressing”.

See what the top of that looks like? Not so pretty, is it? Re-dressing allows you to make sure that both sides of the cheese are flat and purty lookin’.
Return the cheese to the press just like it was before and press at 10 pounds of pressure for 12 hours.
For the 1st 3 or 4 hours you will have to adjust the pressure frequently as the whey is pressed out and the curds compact.
Drying the Cheese
At the end of 12 hours there should not be any more whey being released. If there is, increase the pressure and press for another hour or so.
Remove the cheese from the press and allow it to air dry for 2 or 3 days.
I use a piece of plastic mesh on top of a cooling rack. That allows air to circulate around it.
You can also purchase mats made especially for the purpose of drying cheese.
Turn the cheese over 2 or 3 times a day and keep it covered with a light cloth.
I use one of my bread cloths or a kitchen towel. It doesn’t need to be anything special. It just needs to keep dust and curious kitties off.
After 2 or 3 days the cheese will be smooth and dry and have a thin rind.
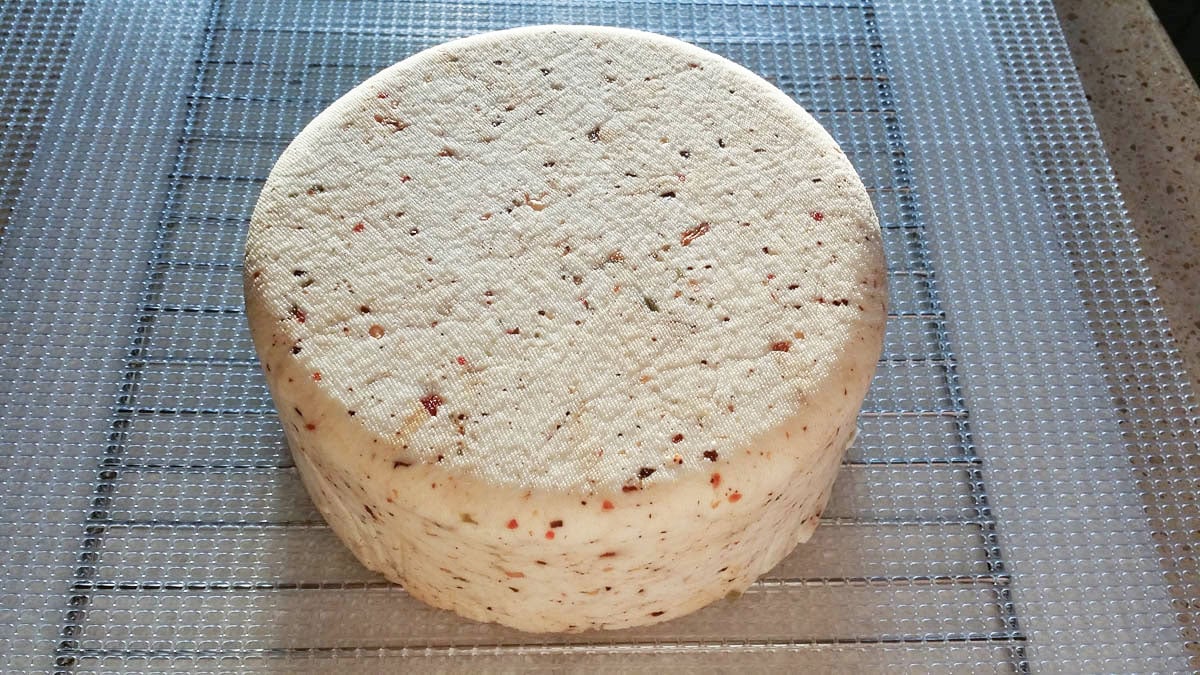
Aging the Cheese
Now that it’s dry to the touch, the cheese needs to age. You can either wax it or seal it with a FoodSaver.
I’ve done both and they work equally well.
Make sure that you dip a piece of towel in vinegar and wipe it all over the outside of the cheese before waxing or sealing it. That will kill any germies that may be lurking on the rind.
Age the cheese at about 55° to 60°F for a minimum of 30 days. If you used raw milk, you need to age it for a minimum of 60 days.
The longer it ages, the stronger and sharper the flavors will be. Turn the cheese over every day so that it ages evenly.
I age my cheeses in the crisper drawer of the fridge. The cooler temperature will make the aging process take longer.
So I age it for 45 days or 90 days for raw milk cheese.
Storing the Cheese
Now that it’s properly aged, you need to decide on storage. If the cheese is waxed, you just need to store it in a cold place. For most people that’s going to be the fridge.
If you happen to be lucky enough to have an underground cheese cave, store it there. Some root cellars are cool enough year round to store waxed cheeses as well.

If it is not waxed, it should be kept refrigerated in an airtight container or zip top bag. You can also toss it in the freezer. Freezing cheese will sometimes make it crumbly, so keep that in mind.
Now, I’m sure you just read all that and you’re thinking, “Oh my sweet Nellie! I could never do all that! It’s too complicated!”
And, my friend, you would be soooo wrong! Once you’ve done it a few times, it really doesn’t take a lot of hands on time. It’s mostly waiting for the cheese to do it’s thang.
And the taste! So amazing! So totally worth it!
You’re friends may look at you a little funny when you tell them you’re going to make your own Pepper Jack cheese. But they’re gonna help you eat it for sure!
So give it a go. Your friends will thank you!

More cheese and cultured dairy recipes you should try:


Pepper Jack Cheese
Ingredients
- 2 gallons milk not Ultra High Pasteurized
- 1 packet mesophilic cheese culture
- OR 1/8 tsp bulk mesophilic culture
- 1/2 tsp regular strength liquid rennet dissolved in 1/2 cup cool filtered water
- 1 Tbsp sea salt
- 1 3/4 tsp coarsely ground peppers of your choice
Instructions
- Heat the milk to 90°F in a stainless steel pot.
- Add culture and allow to re-hydrate for 2-3 minutes. Stir in with a stainless steel or wooden spoon with an up and down motion.
- Cover pot and let sit for 30-45 minutes to culture.
- Stir in any cream that may have separated, and add the rennet and water mixture stirring with an up and down motion.
- Let the pot sit undisturbed at 90°F for 45 minutes or until the whey separates out from the curd.
- Cut the curd into 1/4 inch cubes and let sit undisturbed for 45 minutes.
- Bring the temperature slowly up to 100°F over the next 30 minutes, stirring frequently.
- Keep the temperature at 100°F for the next 30 minutes, stirring frequently.
- Let the curds settle for 5 to 10 minutes and then pour half the whey out. Leave just enough to cover the curds.
- Keep the curds at 100°F for another 30 minutes, stirring frequently.
- Pour the curds into the colander lined with butter muslin. Add the sea salt and the pepper mixture. Mix in thoroughly.
- Let the curds drain.
- Line the mold of your press with butter muslin and pack the curds in. Press for 15 minutes at 5 pounds of pressure.
- Remove the cheese and redress. Press for 12 hours at 10 pounds of pressure.
- Remove cheese from press and allow to air dry for 2 to 3 days.
- Wax or vacuum seal cheese and age at 55° to 60°F for 30 days or 60 days if you used raw milk.