If you’re looking for a great way to preserve your fruits, vegetables, or even meats, dehydrating food at home is the perfect solution!
Dehydrating is a simple and economical way to store your food without the mess or hassle of canning. With minimal effort, you can easily make a range of nutritious and delicious snacks, from dried fruit to jerky, that you can enjoy for months.

Dehydrating as a form of food preservation has been around since the beginning of time.
As with all the other methods of preserving food there are advantages and disadvantages, and some things do very well. Others, not so much.
I really don’t think that any one method is the “best” way to preserve and store food. I personally use a combination of all of them. There are some things that do better with each method, and that sometimes depends on what the end use is going to be.
Why dehydrate food?
I get asked that a lot, actually. People know that I’m a crazy canning lady, so they wonder why I dry stuff too. And that’s a fair question.
The number one reason is that it’s so much easier than canning!
You can just toss stuff in the dehydrator, turn it on, and walk away. I even run it at night and when I’m not home. So there’s that.
Other things simply can’t be canned. Like herbs and flowers for teas. And while you can can greens, I prefer them dried.
Dry foods are great for backpacking and hiking, they have a very long shelf life (like 20 years), and they are easy to grab to toss in soups and stews and other recipes.
Drying food also retains vitamins and minerals, as long as the temperature is kept low enough.
And dehydrating fruits for snacks or fruit roll ups makes it so convenient to have healthy snacks on hand.

What Can You Dehydrate?
My dehydrator runs pretty steadily through the summer dying herbs like chives and basil, and with hibiscus petals and peppermint for tea.
After I harvest and cure the onions, any that area little iffy for storage get turned into dried minced onions. Some of that gets turned into onion powder. I do the same with garlic.
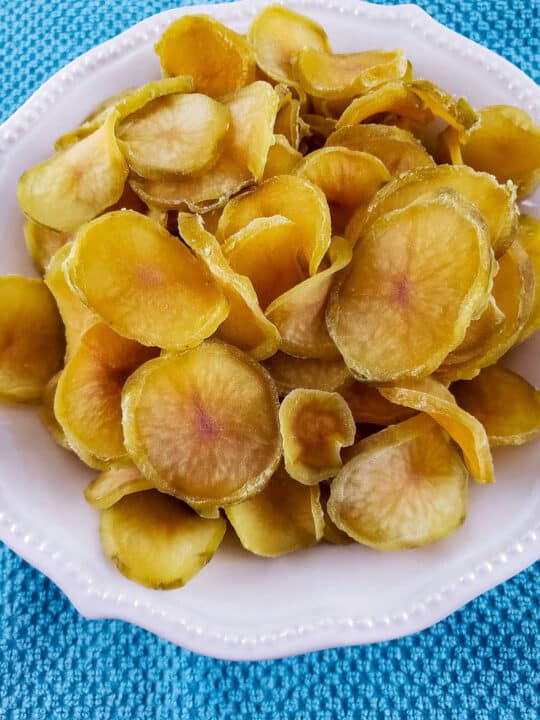
I dry thin slices of potatoes to use in my homemade versions of hamburger helper and scalloped potatoes.
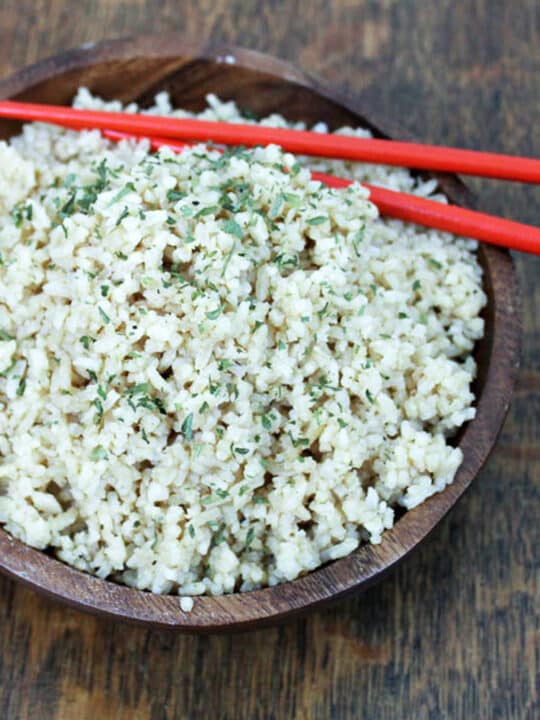
Homemade instant rice and instant mashed potatoes are a huge time saver in the kitchen! And either of those are a great place to start if you’re new to dehydrating.
All those extra greens that you can’t eat because you planted too much of can be dehydrated and turned into a green smoothie powder. It’s a great way to get all the benefits of the dark leafy greens without having to eat all those salads!
I make gallons and gallons of chicken and beef bone broth every year and dehydrating it into bouillon saves a ton of space in my pantry. I put the powder in little 4 oz jelly jars and vacuum seal them to keep it fresh.
Actually, everything I dry is either sealed in a canning jar or sealed in a vacuum sealed bag, or mylar bag to keep the moisture out. Did you know that food that is fully dehydrated and properly sealed, when stored in a dark, cool place, can last up to 20 years? That’s pretty amazing to me.
I think my kids’ favorite use of the dehydrator, hands down, is venison jerky. I usually have to dole it out a little at a time. Otherwise it would all be gone within a day or two.

How about dehydrated cherries to add to granola and trail mixes?
Cooked meats like hamburger and chicken can be dehydrated, and of course the jerky I mentioned earlier.
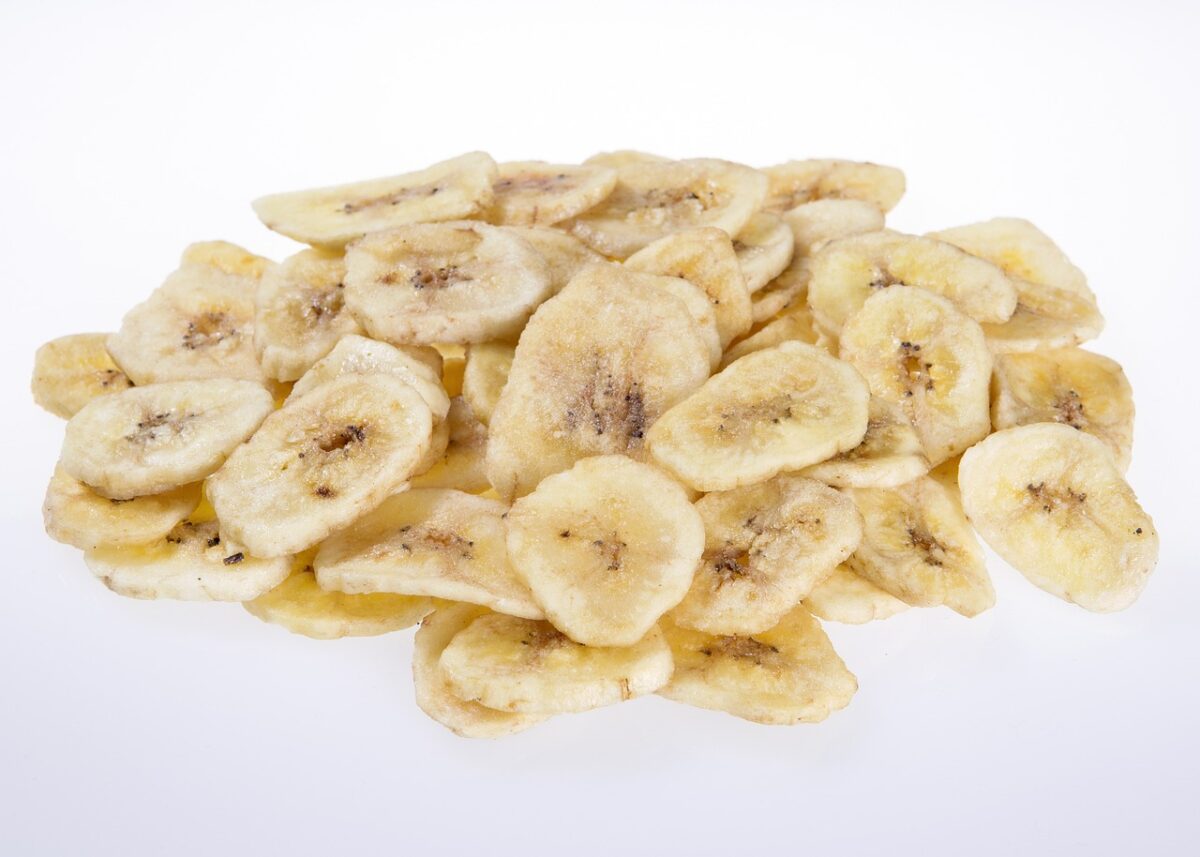
You can make your own raisins out of grapes! How fun is that?!? And apple chips and banana chips and pineapple and apricots and…you get the picture.
And if you sprout your grains for baking, a dehydrator is a game changer!
What It Does
When you dehydrate food, either with an electric unit or using a solar unit, you are drawing the moisture out.
The electric units have a fan that blows warm air across the food surface. The heat pulls the moisture out and the air absorbs the moisture and carries it out of the unit.
If it’s humid where you live it will take longer to dehydrate things because there is already so much moisture in the air. And that’s kinda the downside to using a solar dehydrator or even just the sun if you’re in a humid area.
Without enough air flow the food will often mold before all the moisture gets pulled out of it. Below a certain moisture level molds and bacteria can’t live and multiply. But you have to get the water out fast enough to beat the little beasties. 🙂
Where I am humidity is a huge factor. Especially in the late summer/early fall. If I don’t get my stuff sealed up as soon as it’s cooled off I usually have to put it back in the dehydrator for an hour or so because it begins to rehydrate.

Equipment
Dehydrators
OK, let’s talk about equipment. There are lots of dehydrators on the market. You can get everything from just screens to put out in the sun to the high-end digital thermostat and timer models.
I started with a 5-tray Ronco that cost $20 at the time. It was round with stackable trays and the heating element was in the bottom.
I couldn’t control the temperature (although to be honest I didn’t know that was important back then), I had to rotate trays every couple of hours, and it was difficult to clean. But I used that thing until it died.
After that I moved up to a more expensive 9-tray Excalibur model. One of the things that I LOVE about this one is that the heating element is at the back instead of the bottom. Makes it so much easier to clean!
It’s also all enclosed so it keeps curious flies and spiders and kitties out.
And because you can set the temperature, the Excalibur can also be used for culturing yogurt and other dairy products. And as a proofing oven for bread when it’s cold. I really love multi-purpose items! 🙂
Temperature Matters

I mentioned the temperature control earlier, and I want to talk about that just a minute.
In order for a food to retain the bulk of its nutrition, it needs to stay below 116°F. Anything over that and the enzymes that help with digestion and unlocking the nutrients are destroyed.
I think we can all agree that we need more nutrition in our diets! So that’s why I splurged on a dehydrator with a temperature control.
Now there are many things where the temperature doesn’t really matter, so if you don’t have a temp control on yours, it’s all good.
Anything that has been cooked or will be cooked can be dried at higher temps. In fact, there are some things that MUST be dried at higher temps. Like meat.
And the higher temperature decreases the drying time, which is good. The only thing I’m really careful about are my herbs, yogurt, and fruits and nuts that I’m going to use as snacks.
If you are new to dehydrating I would suggest starting with an inexpensive model. That way you’ll get a feel for how much you will use one. That way, if you use it a lot you can always get a larger, fancier one later.
Other Equipment
I have 2 other items that I consider indispensable that I use when I’m drying stuff. I didn’t always have them, but they save me a ton of time.
They are a pair of herb scissors and a mandoline. They are both inexpensive and I use them all the time, not just when I’m dehydrating. Makes things more uniform so they dry evenly. If you don’t have them, no worries. A good knife can do the same thing. 🙂
And if you love cherries like I do, a cherry pitter is an amazing convenience. I also really like my apple peeler corer slicer. Again, I didn’t always have those, but they can certainly save a lot of time.
Vacuum Sealer
The last thing I’m going to talk about here is a vacuum sealer. I originally got one just for the dehydrated stuff and now I use it all the time. Especially when I process meat.
And it’s great for sealing up sausages so they don’t get freezer burn.
I got a Food Saver model because that’s what happened to be on sale when I was looking for one. And I couldn’t be happier with my choice so I’ve never tried any other brand.
I ordered the jar sealer accessories after a few weeks for the herbs I was drying. Just know that unless you get a commercial grade vacuum sealer, it’s probably going to get too hot if you’re doing a lot of stuff at once. Just let it cool for a few minutes and you’re good to go.
Pre-treatments
There are several fruits and vegetables that will benefit from pre-treating so that they don’t turn brown while drying.
Apples, bananas, peaches, and potatoes are a few of those. Vitamin C crystals, citric acid, or products like Fruit Fresh are your friends here. I use vitamin C crystals at a tablespoon per quart of water. Whichever one you choose to use, the process is the same.
Soak the slices in the solution, rinse, drain, and put on the dehydrator trays. You could blot them dry if you want to. That will speed up the drying time a little. That is a step I usually skip.
Some fruits and veggies need to be blanched before drying to give better results. These would include corn, green beans, carrots, and peas. Anything that would generally need a longer cooking time when raw would benefit from blanching.
When you are drying something new, check the instructions that came with your dehydrator for specifics. Or find a reliable online source to guide you. The National Center for Home Food Preservation is always a great source for information and recipes.
Anything I have here on my site will always have pre-treatment suggestions and temperature guidelines.
When is It Dry?

The last thing we need to cover is really the big question of, “How do I know when it’s done?”
The answer to that is, “It depends”.
Some things are going to be completely dry and brittle. Like rice, bouillon, and tomatoes you are drying to powder. Also onions, garlic, and herbs.
Other things will be a little pliable. That would be stuff like cherries, apples, and fruit leathers. How dry you go is determined by your end use. With meats you would completely dry stuff for storage, but you would leave jerky pliable enough to eat.
Leaving too much moisture will cause things to mold so I always err on the side of caution. You really can’t over dry something. And if it’s not soft enough to eat as a snack when you open it, it will be snackable in a few hours. But again, your manual or on-line source can help you determine how dry to get it.
Make sure things are dry and cooled off before sealing them up. Sealing them while they are warm could cause condensation inside the package or jar.
Storing Dehydrated Food
And that brings us to storage.
In all cases with food storage, there are optimal storage conditions. Light is the enemy of food storage. So is heat, and so is moisture. The perfect place for food storage is somewhere dry, dark, and cool.
Notice I said perfect. There may not be a perfect place in your house. There isn’t in mine, really. So just pick the best place that you have. In closets and under beds are good places, as long as they aren’t right next to the water heater or heat and air unit.
Obviously, in order for your dehydrated stuff to stay dehydrated stuff it must be stored in air tight containers.
You have some options here. Let’s talk about glass jars first.

Glass jars are pretty, but not always so good for long term storage solutions. To be used long term, they need to be dark and you have to be able to seal them air tight. Caning jars can be sealed, but they are clear. They are great for shorter term storage, but only if they will be kept in a dark place.
Vacuum sealed packages are great for getting the oxygen out, but they are also clear. These should only be used for storing things in the freezer or in light blocking food storage buckets. Because, again, we need to keep it away from light.
Mylar bags can be sealed to keep out bugs and moisture, and they block the light. They come in many different sizes and shapes. As far as I know, though, you can’t use them with a vacuum sealer.
A lot of people use oxygen absorbers in their mylar bags. You add them to the package right before you seal them up.
So now to particulars.
So let’s say there’s something you are going to use small amounts of frequently. Like herbs. It would be good to put them in several small jars or packages so you aren’t exposing all of it to moisture every time you use some.
If you’ve been around this site long, you know I love my canning jars. 🙂
And like I said before, they aren’t ideal for long-term storage, but they’re fine for short-term. I usually store my herbs in sealed jars. I put a little in a small spice jar and re-seal the canning jar.
A vacuum seal unit that has attachments for sealing canning jars has become one of my favorite things. They they get put right in the back or my deepest cabinet so they stay in the dark 99% of the time.
Everything else gets sealed in little packets with my FoodSaver. I’ve found that things that are prickly can puncture the bags and allow air in. Things like cooked, dehydrated rice and elderberries are particularly bad about that.
So I got some paper lunch sacks and put the prickly stuff in those first. Then I sealed them in the vacuum sealer. That works like a charm! Then those packages are put in food storage buckets with gamma lids and put in a closet.
Also, make sure to label and date all your jars and packages. And rotate stuff. Use the oldest first. “First in, first out”, is a good motto to live by were stored food is concerned.
And as always with food storage, if you and your family don’t like it, don’t waste space storing it.
I know you’re thinking, “Duh!”, but trust me, it happens all the time. Try new things in small batches and see what you think before spending a lot of time and money doing a big batch.
Keep in mind that with some things a little goes a long way. Like bell pepper, for instance. I use dried bell pepper in 3 things: spaghetti sauce, Italian salad dressing mix, and pepper jack cheese. I’ve found that 2 large bell peppers minced and dehydrated is all I need for a year.
Then there are things that I can’t seem to make enough of. Instant rice and chicken bouillon are some things that I make every 2 or 3 months. Those are so handy for quick meals and I like to keep them on hand.
If your storage options are limited, dry smaller amounts at a time so you can use it up faster. And as always with stored food, “When in doubt, throw it out!”